Planted Aquariums
By Filipe Oliveira
Difficult?
Of course not!
Setup a beautiful planted tank is not so difficult as people think! Choosing the right equipments, additives, soil and plants, this will help to keep a planted aquarium. Of course that when we talk about beauty this is relative, what is beautiful for a person can be ugly or indifferent for others, but is this what distinguish us as human beings.
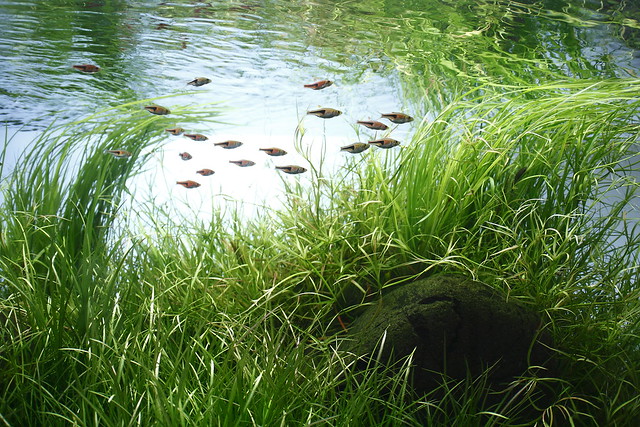
Each planted tank is a planted tank and the most important thing is that persons do it according to their needs and the time that they have to spend daily for maintenance. In case of having some fishes in old Aquariums, the layout needs to be adjusted to their needs, maybe this can reduce the variety of plants, but it is possible to do something beautiful.

Light the source of life.
Light is so important for a planted aquarium?
Sun is our source of life in Earth, without it is impossible to keep any live plant and of course the oxygen to breath. For Aquatic plants occurs the same, each plant has different needs and having a good quantity of light in aquarium will never be a problem because you can always keep low light plants under a good amount of light but the opposite not, the plants can simply die or do not grow.
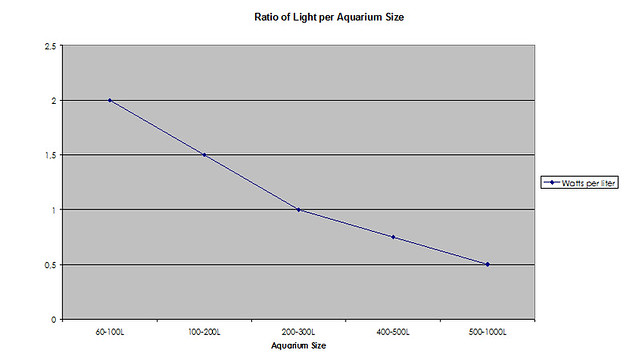
The ratio of light for a planted tank is measure by the volume of water that we have on the aquarium; is higher in small tanks (1 or 2 watts per liter) and decreasing the ratio when the aquarium gets bigger.
The first thing that needs to be chosen very carefully is the lighting system. There are too many lighting systems in the Aquarium market; some uses metal halide bulbs, T5, T8, power compact and recently the LED. My favourites are HQI (metal halide) and LED, then comes the T5 and T8; Power compact can be used because provide us a good quantity of light in a small size, but it isn’t easy to find good and quality bulbs for that system, so for that reason I prefer not use. What I like most in HQI and LED, of course when we use good LEDs and Metal Halide bulbs with high level of CRI (Colour Rendition Intensity), because they emit approximately the light from the sun. The higher is the CRI and near of 100%, better they are. Power doesn’t mean intensity, if we have 70watts of power, whatever is the intensity, we still have 70watts. T5 and T8 are a good combination for HQI, but in my humble opinion, they will be replaced very soon for LED. In case of using only T5 or T8, the better option is use different spectrums between 4.000k to 10.000k.
Decoration Sand or Natural soil?
Decoration Sand or Natural soil?
Which is better for the plants?
If we bring this subject to Nature, we can easily see that in natural soil the terrestrial plants grow better than in sand. At home, if we want to keep plants in pots we use special soil to give to the plants nutrients on the roots for a healthy growing, but why we don’t use sand instead of soil? Plants needs soil rich in nutrients; a soil that lets the roots growing and do not struggle them, and keep some humidity.
On planted aquariums we can provide nutrients below the sand using rich substrate, but what will happens to the roots of the plants when they start growing? Some plants have difficult to spread in sand and some roots just die because the sand compact too much and struggle their growing; for this reason some brands just provide us special soil for aquatics plants, that lets plants growing like in nature and because of its porosity can keep a biological system on the soil to get a balanced Aquarium for plants and fishes.
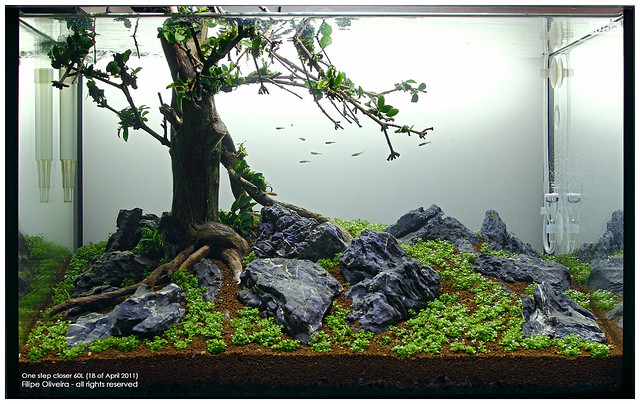
Sand can be used to decorate some parts of the aquarium; zones that we want to give more details and contrast, and let the plants on the soil for a healthy growing!
CO2 Fertilization
Harmful for fishes and plants?
CO2 is very important for plants because they will use it for photosynthesis. If we don’t use CO2 on planted aquariums, plants will not grow as expected and algae will appear.
Harmful for fishes and plants?
CO2 is very important for plants because they will use it for photosynthesis. If we don’t use CO2 on planted aquariums, plants will not grow as expected and algae will appear.
Only in Aquariums with good amount of light is that plants do the photosynthesis, otherwise and if we don’t have light enough the CO2 will not be absorbed and in this case will be harmful for fishes. Plants absorb CO2 during photosynthesis and release O2 to the water, so fishes will have always oxygen on the water to breathe during this process. The photosynthesis only occurs when we have light on the aquarium, so when the light turns on, the plants will start the photosynthesis process and in this moment we need to start the injection of carbon dioxide on the water.
The comfortable way to starts the injection of CO2 on the water is using a solenoid valve connected to a timer, with this we can schedule when the lights turn on and starts the injection of CO2. Solenoid valve permits to turn on and turn off the CO2; stopping the injection of CO2 on the water when the lights turn off, keeping the fishes safety of an overdose of CO2 and breathing problem, because during the time that lights are turned off we don’t need to inject CO2 on the water.
The comfortable way to starts the injection of CO2 on the water is using a solenoid valve connected to a timer, with this we can schedule when the lights turn on and starts the injection of CO2. Solenoid valve permits to turn on and turn off the CO2; stopping the injection of CO2 on the water when the lights turn off, keeping the fishes safety of an overdose of CO2 and breathing problem, because during the time that lights are turned off we don’t need to inject CO2 on the water.

Picture of Pearling; Photosynthesis process. The plant absorbed Carbon Dioxide and is releasing Oxygen.
How to setup a planted aquarium.
What we need?
An aquarium, substrate rich in nutrients, soil, wood or rocks, aquatic plants, CO2 equipment, lighting system, filter and planting tools.
Any aquarium can be used to set up a planted tank, but if it is possible we should avoid using taller and tight measures because the layout will be out of proportion and more difficult to do. A taller aquarium needs more light and forces us to do a big slope of soil on the back to get grown plants at 1/3 of water surface. The tight aquarium (no depth) reduce the working area and when we start planting it seems that is everything so close; to give some depth to the layout is very difficult and only persons with skills can do it. Usually, I look for measures that give me some wide view, like we are seeing a 16:9 wide TV and some depth to place the rocks, woods and plants without being so close of each other.
Next step is chose the correct plants for each aquarium, but and if we don’t know what to use?
When I started in planted aquariums, I tested and studied a lot of plants and their growing, colour, volume, details, etc; but on that time there wasn't too much information on the internet. In ours days, it is possible to find a lot of information about aquatic plants and even that we don’t know their names, it is a question of visit the website of some plants wholesalers to get the right information.
Other way is to analyze the aquariums of others hobbyists and see the set up of each tank to know what they used and then start looking for the plants on web through a search engine… too easy compared to several years ago! In a planted aquarium we can divide the plants by 3 types, foreground, middle and background; if we respect that, for sure that we have half a job done; the other half, free your creativity!
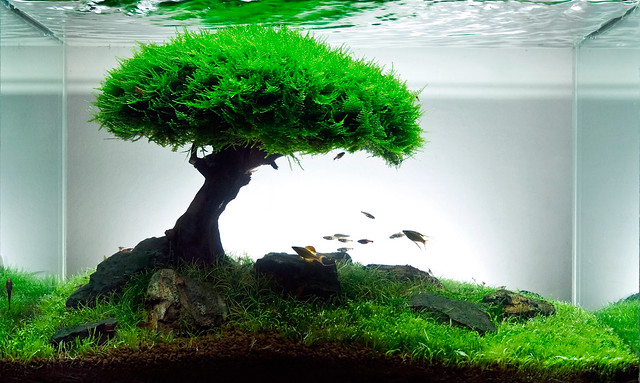
The planted aquarium that I will show below came from a moment of creativity. There isn’t such thing called water bonsai… The tree was made with several pieces of wood attached to a main branch and some aquatic moss tied to the tiny branches.
This was my first attempt to recreate a tree scape on aquarium and with good results.
Some people when saw it during setup and growing process, told me that it wouldn’t be possible to keep such quantity of moss in a small piece of wood; but they were wrong! Of course that I had to have too much careful on the trimmings, but with perseverance and patient, I did it!
I will use a different layout to explain how I have done it; it was my second attempt of Tree Scape and I called him the “Pinus Pinea”.

First step: Cover the bottom of the aquarium with rich soil. I used ELOS Terra Zero and ELOS Bottom Mineral. Those products are very rich in nutrients (Micro and macro nutrients) and the plants will use it for a constant feeding, reducing the liquid fertilization on the aquarium since 1st week; Careful never let this products in contact with water column. ELOS Terra Zero is a powder and I use it for a long keeping term because plants when starts releasing their roots, they grow in direction of the bottom glass, so they will have always nutrients even after 1 year after setup. Then I covered entire bottom with ELOS Bottom mineral avoiding that the powder passes to the water column for some reason. This rich substrate can be used without Terra Zero, but depending on the quantity of the plants, it will lose some of its properties after 8~12 months. So, if you want to keep an healthy layout for a long time, I suggest the use of both products always well covered by the last layer of soil (ELOS Terra).
Second Step: Cover the entire bottom with ELOS Terra (Natural Soil) with a layer of 3~5cm on the front and 5~10cm on the back. Depending on the type of layout, we can give more depth to the layout creating a good slope of soil on the back.
Third Step: Place the wood and rocks giving a good appearance. This is the big challenge for all aquascapers or people that is just starting. It is not easy to choose the right hardscape and keeps it in proportion. Usually I take more than 1month looking for good pieces of wood and rocks to use on my layouts. If it is possible have more pieces of wood or rocks during the setup process and adapt what likes most for of each situation. In this case, I spent a lot of time preparing the wood that will simulate the tree, to be in scale and more realistic as possible. From a three pieces of Red Moor wood, I cut them and joined to give the best shape. After I tied the moss using fishing line (very thin) all over the small tiny branches and place the simulated tree on the aquarium. This will be the focal point; the first thing that people will see when look to the aquarium. Avoid centring the focal point; it should be placed on the sides but never closer to the glasses. Try to divide the aquarium in three parts and place it on 1/3 or 2/3. It was time to give more details to the layout; using small rocks we give more contrast to the foreground and delimit some areas of the aquarium.
Fourth step: Start planting. First we remove the wool from the plants (98% of the cases), separate the plant in a few parts (in case of foreground plants) and using a tweezers we plant the small pieces in order that they will be fixed and not totally covered by the soil. In case of using Hemianthus callitrichoides cuba or Utricularia graminifolia as foreground plant, they needs a special method to plant and preparation. We need to cut the wool without release the plant with 1 or 2cm, then cut the plant with the wool in several pieces and plant it with the wool. The wool will help to keep the plant in the soil and it will work like an anchor, avoid that plant release from the soil because of their tiny roots.
Final Step: Fill the aquarium with water very slowly, avoiding that the soil will be whirled around. We can cover the entire bottom with newspaper, this will help to keep the soil intact and when water gets half aquarium, the newspaper will start to float and can be removed.
6 months later and after several trimmings the result was this:
Setup:
Name: Pinus Pinea
Size: 55x35x35 ( long*wide*tall) cm
Volume: 67L
Temperature: 25ºC
pH: 6,8
Lighting: 3x24w T5 6.500k
Filter: Aquaclear 25
CO2: ELOS Set ECO + Solenoid with 1bps
Substrate: Elos bottom mineral, Elos Terra zero, Elos Terra natural soil small grain (12L)
Fertilization: Elos Fase1, Fase2, Extra1 and K40 by Elos Schedule program
Fase2 on Mon, Wed and Fri
Fase1 + K40 on Tue and Thur
Extra1 + K40 on Sat
with 0.5ml of each product
Maintenance: TPA once a week of 20%, usually I do it on Sunday.
Rocks: Schist
Wood decoration: Red Moorwood, DIY from 3 branches of wood
Plants: Eleocharis parvula, Utricularia graminifolia and Singapore moss (Vesicularia dubyana)
Fishes: Otocinclus sp, Boraras maculatus and Iriatherina werneri
Invertebrate: Neocaridina heteropoda var. red and Caridina cf. cantonensis ‘Tiger’



3 comments:
Im planning to do something like this myself and i was wondering when you planted the grass did it spread like that itself?
thanks for your informative post.its helpful to understand it.keep blogging
buy aquarium soil online india
Ahha, what a fantastic journey it was! This was what I wanted to learn. Yeah, setting up a beautiful planted tank is not so hard if you have the perfect ideas and knowledge on this. The most unhappy fact is that most of us love to have a lovely aquarium at our home but we are not aware of it's natural value to maintain it. Digging the deep into your long article I found huge inspiring and thoughtful information that can encourage us to take a try. I can mention here about aquarium fern that can be a great startup for the beginners as it is also very easy to grow. Anyway, I was pretty much satisfied with the details and explanatory value delivered by you for your fans and readers. I like it very much.
Post a Comment